It's Fall Pinterest Challenge time!
Sherry and
Katie came up with this idea over a year ago, and I loved joining in on the fun the past two seasons. I have created
framed tickets with old tickets from football games and then we built
bathroom storage in the summer.
This time I wanted to get a little crafty. I have seen a lot of use for pallets and wanted to create a custom piece of art. This was some of my inspiration:
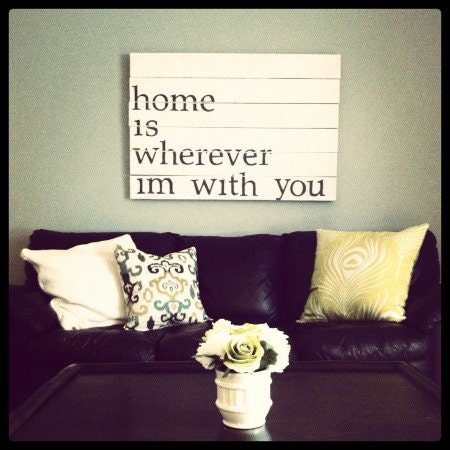
And this is what I ended up with.. love it!
Before I got started on the project, I decided to let Greg in on my idea and see if he had any ideas on how to complete it. We make such a great team. I research and find the ideas, then he helps me execute them with all of his knowledge and skills.
First things first, we needed a pallet. We found an old one at Greg's work and it needed a good rinse. It was dirty, dusty and oily. Friday night we used some car tire cleaner and a rough brush to scrub it down. We brought it in that night to dry off and we had a clean surface on Saturday. This is what it looked like before we started destruction:
We needed to get the top boards off the pallet. Greg used a hammer and crow bar to pry them off. Make sure you take your time on this part. Greg took the lazy way out on one board and tried hammering it from the back. That ended up in a split board (good thing I only needed 4).
We (Greg) successfully got 4 boards off the pallet and then needed to get the nails out. They were a little old and rusty so he first hammered them from the back to loosen it up. Then he just needed to pry them out.
Next up was arranging the boards. We played around with the four boards to get them in an order we liked. We wanted to make sure the knots were in ok spots and that they fit together nicely. Then we flipped them over in that same order, and used brackets to secure them together. The brackets were placed on ends and in the middle for extra support.
 |
| front |
 |
| back |
Once the four boards were all together, we checked the size of the pallet to the space. Perfect.
Next up, the letters. I knew I wanted it to say 'home is wherever I'm with you'. I think this is a good quote for an entryway, but I also love this song by Edward Sharpe & The Magnetic Zeros. It is catchy and fun. I think it went well with the gallery wall on the opposite wall. I used my Cricut to get the letters to the size I wanted and they were used as a template.
Once I got the saying how I wanted it, it was time to paint. I first painted the entire pallet a flat white we already had. I used a foam brush to apply a thin layer. I let this dry overnight.
While it was drying, I brainstormed ways to adhere the letters. I just wanted them as a template, so I had to use something that was temporary, but would stick well enough. I originally thought Mod Podge was the answer, until Greg chimed in that the paint probably wouldn't go on very smoothly on top of it. Duh. I was just worried about them sticking. So I grabbed a scrapbook dot tool and ran this along the back of each letter and pushed them on to the pallet.
All the letters were down on the pallet. I was worried there would be some paint that would bleed through, so I sealed the letters down with a thin layer of white paint. For this step, I used a small foam roller.
It didn't go as planned. The letters got wet and wrinkled a little and it also didn't seal them down very well. After it was dry, I went back and stuck some of the letters down a little more securely before painting it a different color. Then I grabbed the same paint that we used in our family room. It is a greenish gray color that changes at different angles and times of the day. I used a small foam roller for this step as well.
I left a little white peeking through for a more distressed look.
I let the top color dry for a few hours, then it was time to take the letters off. Again, didn't go exactly as planned. The dot tool adhered the letters to the pallet better than I thought. For certain letters, we needed to use a pocket knife to carefully peel them up. No big deal, just gave us a more worn look.
The second to last step was distressing it. I used some sand paper and a wire brush to achieve the look I wanted. I lightly roughed up all the edges and sections in the middle that looked a little too perfect.
Last up: hanging it. We used some extra picture hangers we had lying around along with Greg's favorite screws, (they hold everything).
I will try and get some better pictures in daylight, but I LOVE the result! Best part... all materials were free or already owned.
Sorry for the extremely long post. I hope this helps you with your pallet art :)
xo, Erin

.JPG)
.JPG)
.JPG)


.JPG)


.JPG)
.JPG)




.JPG)